

A wedding favor is a diminutive gesture from the couple’s side, presented to everyone. It can be a keepsake favor for the guests to take home with them; or an edible one which they are likely to be served before the dinnr. Some favors are interactive and some are functional. Another popular wedding favor is seed packet wedding favor which serves great significance. There are plenty of them which can be homemade easily with a little help and deliberation. They also cost light on the pocket and look innovative too. Homemade wedding favors act as an intriguing as well as a warm token of affection; which can entice all the compliments from the guests easily. For your ease and comfort we have shortlisted five interesting homemade wedding favors which you can easily make at home:
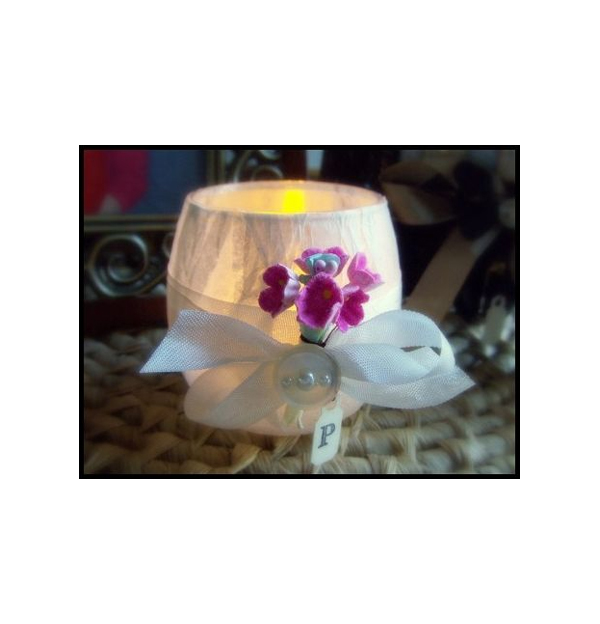
1. Altered Votive Candle Holder

Things required:
- Clear Votive Holder
- Mini Alphabet Stamp Set
- Black Ink Pad
- 1 – Jewelry Tag
- 1 – White Button
- 3 – Self Adhesive Pearls
- White Tissue Paper
- Collage Pauge Instant Decoupage (Matte)
- White Seam Binding or Ribbon (approximately 30” in length)
- 1 – Small Bunch of Flowers or Single Flower
Tools needed:
- Scissors
- Paint Brush
- Adhesive
Procedure:
- Enfold white tissue paper around the votive holder and trim tissue paper from the top.
- Apply Collage Pauge Instant Decoupage (Matte), with a small paint brush until the tissue paper is attached to the votive holder, let it dry for sometime.
- Once it’s dry trim off the remaining tissue paper which is not flush.
- Incise white seam ribbon to approximately 30 inches in length. Find the center of the ribbon, drape around the votive opening at the front cross in the back and fetch seam binding or ribbon back to the front again; tie a knot, place a single flower or small bunch of flowers on top of the knot and tie a bow.
- Apply three self adhesive Pearls on top of a white button, and then attach button to bow center.
- Stamp monogram on the jewelry tag carefully, using black ink.
- Attach jewelry tag around the flower bunch to make it look more beautiful.
2. Garden Flowers: “Our Love Blooms” Seed Paper Favor

Things required:
- Arnold Grummer’s Cotton Linter Casting Squares: 2 oz package
- Arnold Grummer’s Butterfly Clay Casting Mold
- Flower seeds
- Blender or hand blender
- Terry towel
- 2 large cups
- Sponge
- Cardstock
- Accent cardstock
- Handmade paper pieces
- Lollipop sticks (available at craft stores)
- 1/2″ wide sheer ribbon: 4″ length per favor
- 7″ papercraft cone: 1 per table
- Color pencils, glitter glue
Procedure:
- Tear off 4 cotton linter squares. Place in blender with 1 cup water. Blend for 10 to 15 seconds.
- To tint pulp, add a 1″ square of tissue paper to pulp before blending.
- Add a pinch of flower seeds to pulp and stir. Do not blend seeds.
- Set strainer on cup. Pour blended pulp with seeds thru strainer. Save water in cup for next cast.
- Plop pulp directly onto mold before removing any water. Pat pulp into image. Tilt mold over cup. Press water out of wet pulp with fingers.
- Use sponge to remove more water. Press pulp into every detail.
- Use a terry cloth towel to remove last amount of water. Press firmly.
- Ways to dry butterfly paper: 1.) Set mold in 250 oven till cast lifts off mold, about 10 mins. 2.)Gently wave hair dryer over back of cast till paper is dry enough to peel off mold. Set cast on counter to finish drying. 3.) Set mold in front of household fan.
- Trim cast. To decorate it, highlight edges of cast with color pencil and glitter glue.
- Attach cast to lollipop stick with hot glue.
- Print favor tag on cardstock using home computer. Side 1: Couple’s names. Side 2: Directions- “Place this seeded butterfly paper into the ground and cover lightly with soil. Soon sweetly scented flowers will grow to remember us by.”
- Attach tags with ribbon. Place 8 favors in paper covered cone embellished with ribbon and handmade paper. Set on tables or hang on ornamnet hangers at the reception.
3. Heart Tin Ornament

Things required:
- STYROFOAM* Brand Foam:
- Heart, 3″ x 1/2″
- Small plastic squeeze bottle, 1/2 oz., with 7mm stainless steel tip (optional)
- Sheer silver wire-edged ribbon, 1/2″ x 1/3 yd.
- Smooth-surface finish for plastic foam
- Faux finish of choice (pewter and silver blue shown)
- Dimensional paint, any color
- Sheer white ribbon rose with leaves, 3/4″
- Silver cord, 8″ length
- Pencil
- Ruler
- Wooden skewer
- Craft stick or palette knife
- Disposable sponge brush
- Disposable palette
- Water basin
- Paper towels
- Scissors
- Transfer paper (optional)
- Low-temp glue gun and glue sticks
- “Tin” Heart Ornament
Procedure:
- Put in skewer into center top edge of heart. It follows manufacturer’s instructions to apply surface finish to all sides of heart. Let dry.
- Use pencil and transfer paper to transfer pattern to both sides of heart, or sketch own design. Use dimensional paint to outline designs. Outline heart edges with series of tiny dots, painted very close together. Note: Greater control and thinner lines can be obtained by squeezing paint into plastic squeeze bottle, then using narrow metal tip to draw. Let dry.
- Follow manufacturer’s instructions to apply two coats faux finish to all sides of heart. Let dry.
- Knot cord ends; glue knot into skewer hole in top of heart. Tie ribbon into bow. Glue bow and ribbon rose at base of cord.
4. Votive Host Gift or Party Favors

Things required:
- Votive with candle included, $.50 per piece
- Scrapbook paper – 1 sheet, on hand
- Silver Glitter Mod Podge, on hand
- Paper punches, on hand
- Buttons – seven coordinating, on hand
- Craft glue, on hand
- Paint brush, on hand
- Ruler, on hand
Procedure:
- Punch down 14 equal sized flowers on the scrapbook sheet. Seven will use as a bottom layer and rest will be used for flipping over and layered.
- Apply your Mod Podge directly to the glass using your brush. I used a medium layer.
- Grab your punched shapes and place them on the votive. Smooth down carefully so you don’t rip them. Keep working your way around the glass, applying Mod Podge and laying down shapes.
- Once you’ve gone all the way around, allow to dry for 15 – 20 minutes.
- Go back to your votive and apply embellishments with craft glue. Allow the votive to dry for a few hours while you get ready for your party.
5. Heartfelt Collection: Cookie Favor

Things required:
- Scraps of handmade or decorative paper
- Cellophane bag
- 6″ Ribbon
- Hole punch
- Cookie or other favor
- Scissors
Procedure:
- To make the header card for your favor, you will have to follow some easy steps carefully. Measure the width of your cellophane bag and add 1/4″-1/2″. This is the width of your header. So tear or cut the header from a scrap of handmade paper to this width x 4″.
- Fold the paper in half so the header is 2″ on each side. If you don’t have any scrap handmade paper(you can always use decorative paper)
- Place cookie or favor into cellophane bag and place header onto it.
- Punch two holes to each side of center, carefully holding all three layers even (header front, cellophane bag, header back).
- Thread raw edges of ribbon through holes, cross at back, thread back to front creating a bow. Trim.