

You know there are many things that you need not spend upon so lavishly and yet make everything look so elegant. One of the things that you can do or should do; as it is a wonderful personalized experience as well is making your own wedding invitations. Need some guidelines and a process before you lay hands on doing the DIY? So why worry? Just read the guidelines mentioned here and you will be able to create wonderful wedding invitations denoting the sound of your wedding bells to your loved ones.

Difficulty level: Moderately easy
Time required: 15 minutes (for one wedding invitation)
Things needed
· Save the date cards with the envelopes
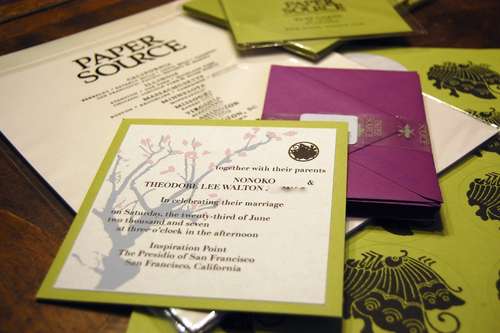
· Invitation with reply card and envelope
· Hotel or the wedding venue directions card and envelope
· Stickers
· Pens/ Colors
· Stamps (for addresses)
Procedure
Here are the small and little steps that will eventually help you end the DIY process:
1. First thing first; it is always good to create a blueprint of this DIY process. So write on a blank paper whatever you desire to include in your wedding invitations. Also write all that you will need for the process so that there is the least possibility of making an error.

2. It is always good to make your wedding guests feel comfortable. Check your wedding list and get to know about any wedding guests that may not know your language. For that you will have to create a translated version of your entire wedding card

3. The third step involves making ‘save the date’ cards. Write down on the card that you brought for this purpose and if you like then add a ribbon to its top.

4. Now, we move on to the design of the invitation. This is a very important step. See a few wedding invitation designs on the internet and then imagine in your mind what is best suited for you. When you are ready write and color down all and everything. If you want some elegance to be included then use semi-clear vellum that will add an angelic feel to your wedding invitations.

5. Put the invitations and the save the date cards in the respective envelopes and make sure that the exteriors also do look nice and pretty. Keep it simple and short. You can attach ribbons to the envelopes if you like to.

6. You are now all done with the invitations and the save the date cards for your wedding. Now you need to create the reply cards. So now in your sixth step, create a simple reply or the response cards and mention there the three possibilities like ‘yes’, ‘no’ and the ‘maybe’.

7. Finally, put everything together in some big beautiful wedding envelope. Stamp it with the address of your wedding guests. You have thus created your own wedding invitations. Bravo!

Things to watch out for
· Keep in mind the wedding theme you have planned for your wedding.
· If you somehow use glue while doing this DIY then you must let the wedding invitations to dry for a satisfactory period.